Whether you’re designing a business card, brochure, or poster, proper file setup is crucial to ensure your printed piece looks professional. This guide covers everything you need to know about setting up files for print, including crop marks, bleeds, and software-specific tips for Canva, InDesign, Illustrator, and Photoshop.
Why File Setup Matters for Print
When you design something for digital printing or offset printing, you need to worry about how a printer will cut the paper or if colors will shift slightly. For either kind of printing, you need to prepare your file to:
- Account for bleed (the area that gets trimmed off)
- Include crop marks (guides for where to cut)
- Use the correct color mode (CMYK, not RGB)
- Ensure high resolution (at least 300 DPI for Photographs)
- Ensure the type is high resolution (2400 DPI)
Skipping these steps can result in awkward white borders, misaligned cuts, or blurry graphics or type.
Key Print Setup Concepts
1. Bleed
Bleed is the extra area beyond the trim edge of your document. Printers use this margin to ensure that your design extends to the edge of the paper after trimming. Standard bleed is usually 0.125 inches (3mm) on all sides. Example: We print a sheet that is 9 x 12 and trim back to the finished size of 8.5 x 11 with the print running all the way to the edge of the sheet.
2. Crop Marks
Crop marks indicate where the document should be cut. They are positioned just outside the trim line and are essential for accurate cutting.
3. Safe Zone
The safe zone is the area inside the trim line where all important text and graphics should be placed, so they don’t get accidentally cut off.
Setting Up for Print in Different Programs
Canva Print Setup
Canva is great for beginners, but it requires a few extra steps for professional print setup. We don’t work in Canva but can take pdf files generated with the program.
Proper Setup Steps:
- Choose Create new document. The default size is 8.5 x 11
- Set up document size or pick a template in the size you are using.
- Enable Bleed:
- Click “File” → Check “Show print bleed”.
- Manually extend background images/colors beyond the dotted bleed line.
- Crop Marks and PDF Export:
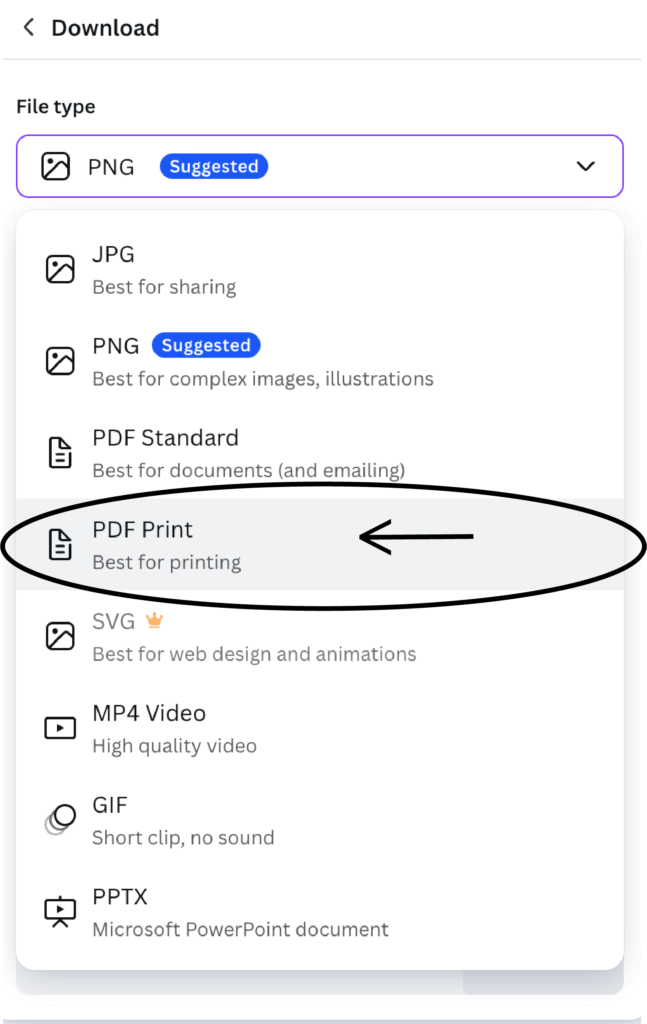
- Click File → Download → PDF Print.
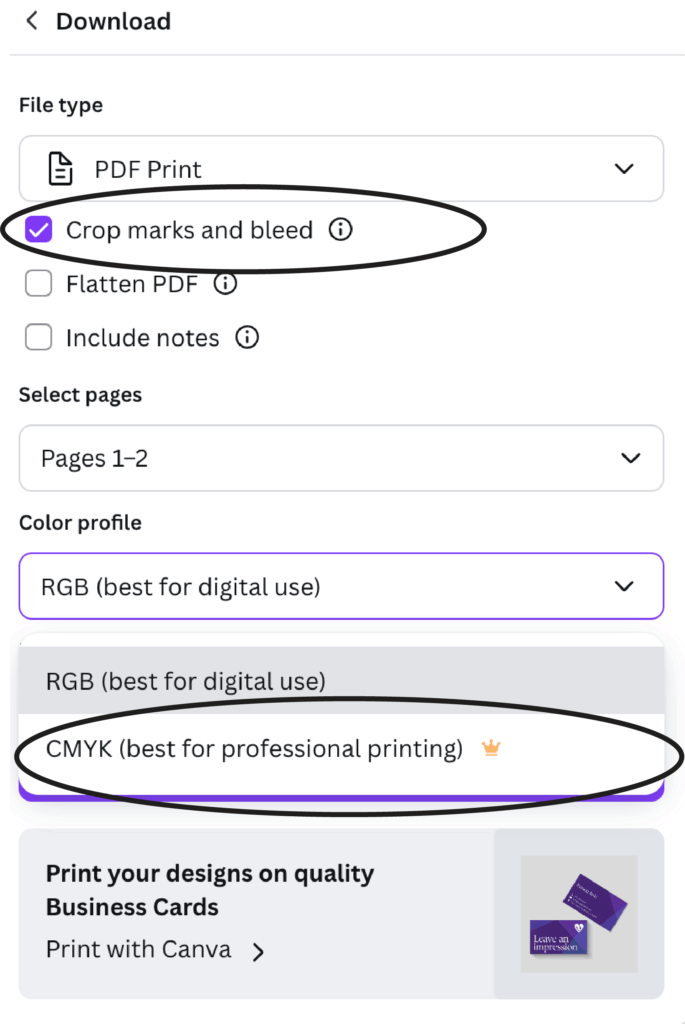
- Check “Crop marks and bleed” before downloading.
- Proof your pdf file before sending to Dave’s
Limitations:
- Canva doesn’t offer custom bleed size control.
- CMYK export isn’t available, so colors may not be exact.
Setting Up Files in Adobe InDesign
InDesign is ideal for complex, multi-page documents.
Steps:
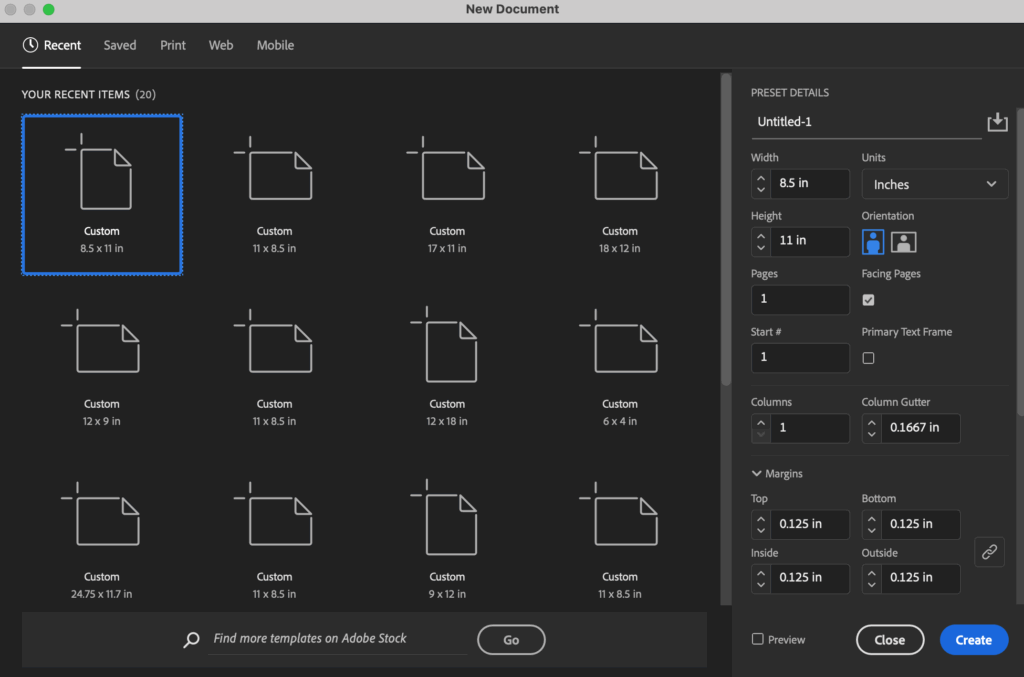
- Create a New Document:
- Set your trim size.
-
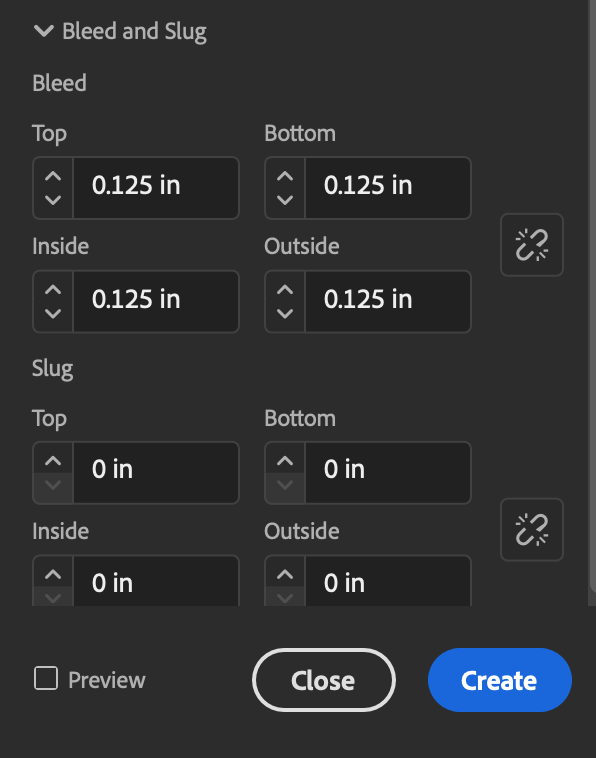
- Click “Bleed and Slug.”
- Set bleed (typically 0.125″ or 3mm).
- Design: Extend background and elements that should bleed to the red bleed guides.
- Exporting:
- Go to “File” > “Export.”
- Choose Adobe PDF (Press Quality).
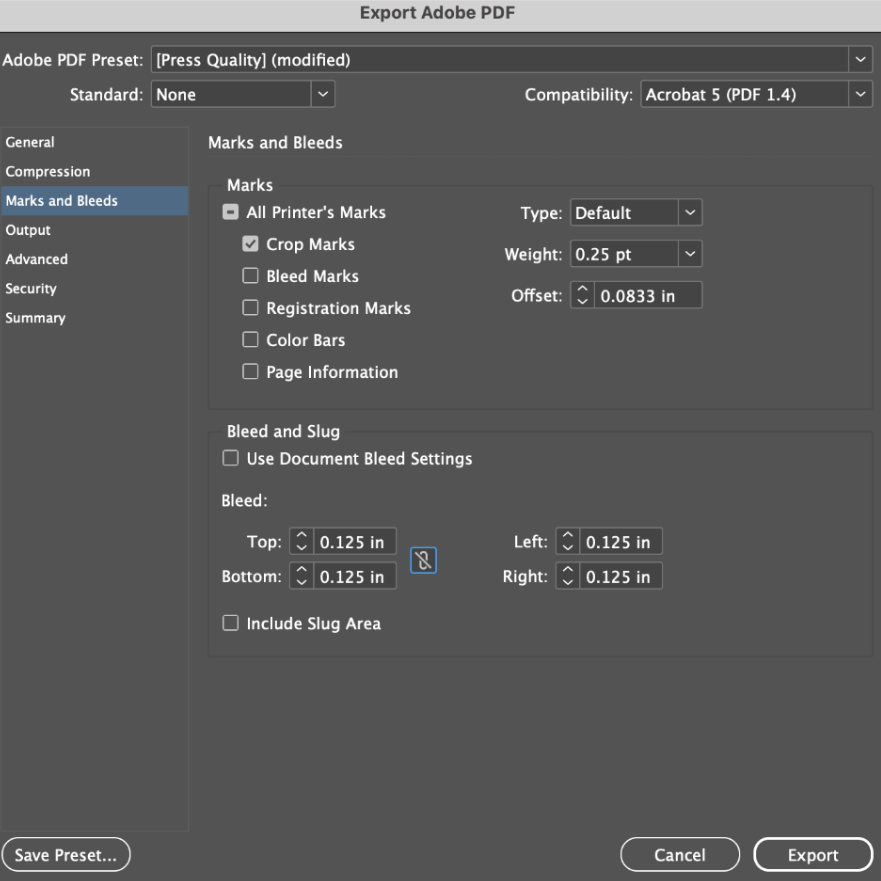
-
- In the Marks and Bleeds tab:
- Check Crop Marks.
- Check Use Document Bleed Settings or manually set at .125 for all sides.
- In the Marks and Bleeds tab:
Tip: Use a print proof or test print if color accuracy is critical.
🖌️ Setting Up Files in Adobe Illustrator
Illustrator is a vector-based design program, ideal for logos, business cards, and high-resolution posters.
Step-by-Step:
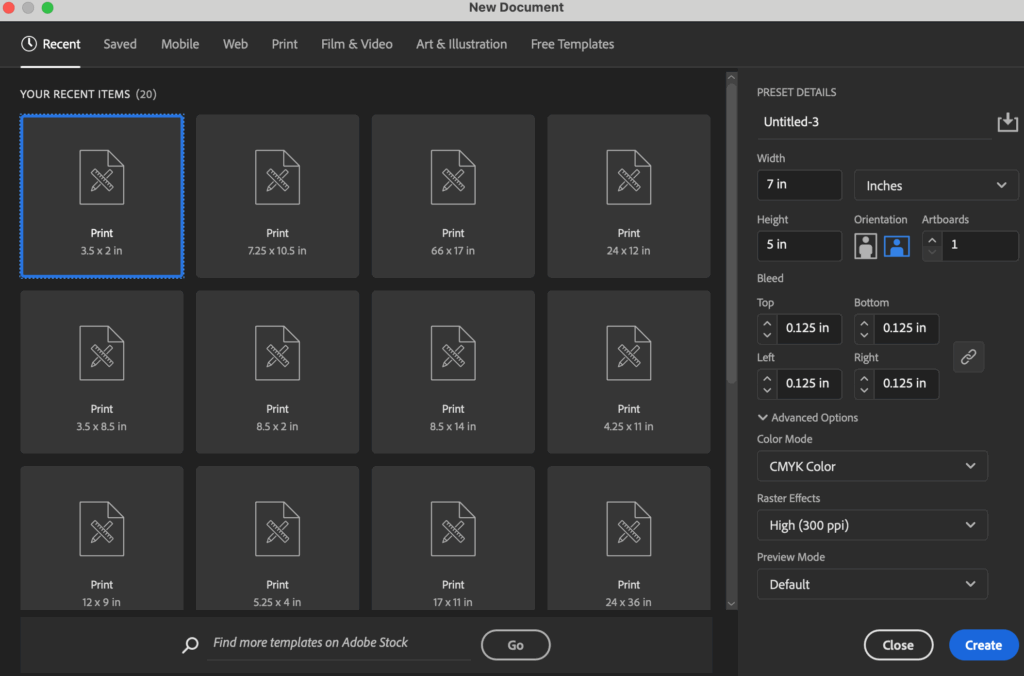
1. Create a New Document
- Go to File > New.
- Set the width and height to your trim size (e.g., 5″x7″).
- Click on “More Settings”, and set the bleed to 0.125″ (or 3mm) on all sides.
2. Design With Bleeds in Mind
- Extend background images or colors beyond the artboard to the red bleed line.
- Keep text and logos within a safe margin (at least 0.125″ inside the trim size) to prevent accidental cropping.
3. Exporting Your File for Print
- Go to File > Save As, and choose Adobe PDF.
- In the Save Adobe PDF window:
- Choose Press Quality under “Adobe PDF Preset”.
- Go to Marks and Bleeds.
- Check Trim Marks.
- Check Use Document Bleed Settings or manually set at .125”.
- Click Save PDF.
✅ You now have a professional, print-ready PDF with crop marks and bleed.
🖼️ Setting Up Print Files in Adobe Photoshop
Photoshop is best used for raster-based print designs like image-heavy posters, photo collages, or custom artwork. What Photoshop isn’t ideal for is setting up your type. Our suggestion is to do any photo manipulations in Photoshop and do all the other type etc in Illustrator or Indesign.
Step-by-Step:
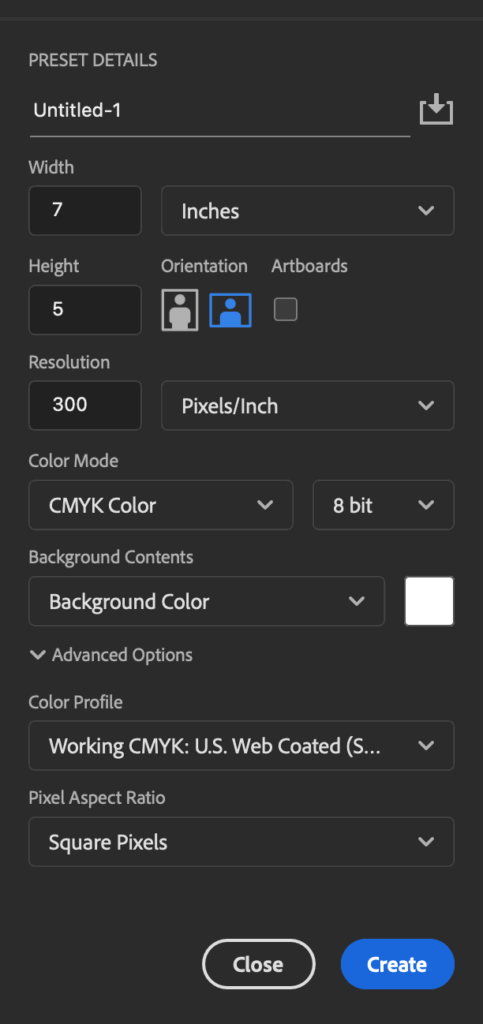
1. Set Up Your Document With Bleed
- Go to File > New.
- Set the canvas size to include bleed manually. For example:
- Final size: 5″x7″
- Add 0.125″ bleed on each side → Final document size: 5.25″ x 7.25″
- Set resolution to 300 DPI.
- Set color mode to CMYK for print.
2. Design With Bleed in Mind
- Place images and backgrounds to fill the entire canvas, including the bleed area.
- Keep text and important elements within a safe zone (at least 0.25″ inside from the trim edge).
3. Add Crop Marks (Optional but Recommended)
Photoshop doesn’t have a built-in crop mark generator like Illustrator or InDesign, but you can:
- Manually create crop marks using guides and shape lines.
- Or export the file to Illustrator or InDesign and add crop marks there.
4. Exporting Your File
- Go to File > Save As or Export > Export As.
- Save as a PDF or TIFF (if your printer accepts it).
- If saving as a PDF:
- Use Photoshop PDF format.
- In the export dialog, select High Quality Print, then check Include Bleed (if using Photoshop 2024+).
📌 Tip: Always double-check with Dave’s staff as to whether they require crop marks and what file type they prefer (PDF, TIFF, etc.).
✅ Get Your Print File Setup Checklist Here
Get your Dave quote
As a family owned business, Dave the Printer has been bending over backwards for over 50 years to make sure we provide both quality printing and great customer service. We will not leave you waiting, we understand that time is money. Our team at Dave’s would be happy to meet you in person at our office in the Design District, via email at service@davetheprinter.com or you can simply give us a call at 214-630-4017.